The SOLOXR’s Smile Connect VR Platform is a high-fidelity virtual reality PC-VR training system built on Unreal Engine 5. It delivers photorealistic, interactive simulation environments across Meta Quest headsets, Windows desktop clients. This manual covers everything you need to get started, navigate the platform, and make the most of every simulation session.
Document Scope
This manual is intended for three audiences:
End Users (Learners / Trainees) — operating the VR headset or desktop client, launching and completing simulations
Instructors / Facilitators — configuring scenarios, monitoring live sessions, and reviewing performance reports
IT Administrators — installing, deploying, and maintaining the platform infrastructure
i Note Sections 2–4 cover hardware setup and first launch. Section 5 covers the simulation experience. Instructors should focus on Section 6. Admins should refer to Section 7.
Platform Architecture Overview
The Smile Connect VR platform consists of three integrated layers:
Instructor Panel
The PC-VR Part of the simulation that controls the simulation
The VR Simulation
The OCULUS part of the simulation
Data Layer
The Data Analytics with automated grading, competency tracking, and reporting
1920 x 1080 minimum; 4K recommended for desktop observation mode
Network
50 Mbps broadband; <50 ms latency to nearest cloud region
⚠
CAUTION: Do not attempt to run the VR simulation on devices below the minimum specifications. Degraded hardware can cause simulation lag, which may compromise training fidelity and trigger motion discomfort.
Your IT administrator will install the application into the assigned Laptop / Desktop and make the necessary setting ( Installing the Meta Horizon Link ) and test the cable connection to the Oculus (Recommended using a USB 3 for best performance )
Step 2: Installing the Smile Connect VR Application
Power on your Meta Quest headset and put it on.
Activate the Meta Link Cable Connection
TIP Quick Launch Tip Pin the SOLOXR app to your Quest home screen for faster access. Press the Meta button > App Library > Long-press SOLOXR > Add to Home.
Windows Desktop Client
Download the installer from your institution’s portal or from the SOLOXR Client download link provided by your program administrator.
Windows: Run SOLOXRSetup.exe and follow the installation wizard. macOS: Open the .dmg file and drag SOLOXR to your Applications folder.
On first launch, click Sign In and authenticate using your institution’s Single Sign-On (SSO) credentials.
The application will download the latest scenario library (~1.2 GB) on first startup.
4
Hardware Controls & Navigation
Meta Quest Controller Layout
The SOLOXR platform uses standard Meta Quest Touch controllers. The following table maps each control to its in-simulation function.
Input
Controller
Function
Trigger (Index Finger)
Left
Grab object, interact with UI elements, confirm selections
Grip (Middle Finger)
Left / Right
Hold / carry objects (equipment, instruments)
Thumbstick
Left
Locomotion — smooth walk in the direction pressed
Thumbstick
Right
Snap turn (45° increments) or smooth turn (configurable)
A Button
Right
Confirm / select highlighted menu item
B Button
Right
Reset your position in the scenario
X Button
Left
Open AI patient interaction (verbal input mode)
Y Button
Left
Toggle scenario information / hint panel
Menu Button (≡)
Left
Open main menu / settings / exit session
Meta Button
Right
Return to Quest home screen (exits simulation)
Ctrl + Q
End and submit simulation session
5
Running a Simulation
Launching a Scenario
Log in and navigate to your Dashboard. Assigned scenarios appear under My Simulations.
Select a scenario card to view its details: clinical domain, estimated duration, difficulty level, and learning objectives.
Press Launch Simulation. The application will load the 3D clinical environment (15–30 seconds on Quest).
A brief orientation screen will appear. Review the scenario context and patient information before proceeding.
Press Begin when you are ready. The AI simulation clock starts, and the patient scenario goes live.
The Simulation Interface
Status Bar (top)
Elapsed time, patient vitals strip, and current scenario objective
Patient Avatar
AI-driven standardized patient — speak naturally to interact (Quest/desktop mic)
Equipment Tray
Available clinical tools appear to the left — grab with controller trigger or click
Hint Panel (Y / Tab)
Contextual guidance without revealing optimal decision paths
Decision Nodes
Highlighted interaction points appear as glowing outlines — approach to activate
Vital Signs Monitor
Wall-mounted monitor updates in real time based on your clinical decisions
Interacting with the AI Patient
The AI standardized patient responds to natural spoken language. You do not need to follow a script.
Hold the X button (Quest) or press F (desktop) to activate the microphone.
Speak your clinical question, instruction, or assessment naturally — for example: “Can you describe the pain for me?” or “I am going to take your blood pressure.”
The AI will respond in real time with contextually appropriate dialogue, facial expressions, and physiological changes.
Patient responses and your spoken input are logged with timestamps for debriefing review.
TIP Communication Best Practices Speak at a natural, conversational pace. Shouting or whispering may affect recognition accuracy. Use clinical terminology you would use in a real patient encounter — the AI is trained on nursing scope-of-practice language. If the patient does not respond, press X / F again to re-activate the microphone.
Completing a Simulation
Work through all required decision nodes until the scenario objective is fulfilled or the session timer ends.
A scenario end screen will appear displaying your overall performance grade and a summary of key actions.
Press Submit Session to finalize your results and send data to the LMS.
Your AI-generated Debrief Report will be available in My Results within 60 seconds of submission.
⚠
Do not close the application or power off the headset before submitting your session. Unsubmitted sessions cannot be recovered and will not count toward your grade.
6
Instructor Panel
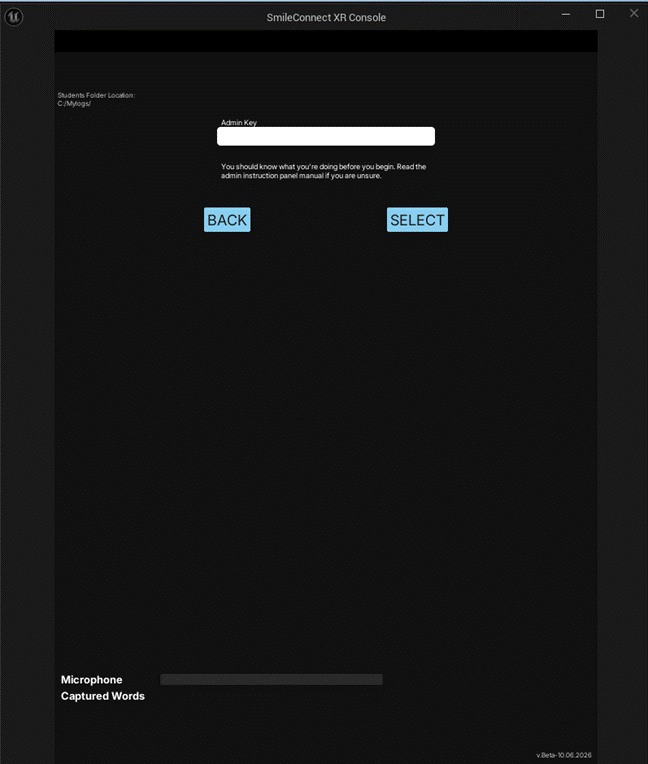
Accessing the Admin Panel
The Admin Panel can be accessed by pressing on the Admin panel link on the bottom right of the Instructor Panel :
Enter the Admin Key : “ Teeth ”
Student Login
Search the student by entering the first letter of the student name
Scenario Management
Assigning Scenarios to Students
Navigate to Courses > [Your Course] > Assignments.
Click Add Assignment and select one or more scenarios from the clinical library.
Configure the due date, allowed attempts, and time limit.
Under Student Access, select the student roster or cohort. Click Publish.
Students will see the assigned scenario on their dashboard at next login.
Scenario Builder
Use the drag-and-drop Scenario Builder to create or customize clinical scenarios without programming knowledge:
Add patient conditions, vital sign curves, and physiological parameters.
Configure branching decision trees — define correct, acceptable, and incorrect action paths.
Set AI patient dialogue scripts or use open-ended AI response mode.
Map rubric items to specific observable student actions within the simulation.
Live Session Monitoring
During a live simulation, the Moderation Dashboard provides real-time visibility into active student sessions:
Student View
3D bird’s-eye view of the student’s position and movements in the clinical environment
Decision History
Timestamped log of every action, interaction, and spoken input
Vital Sign Trends
Live patient vital sign graph updated in real time
Scenario Injection
Remotely trigger new clinical events (e.g., sudden deterioration, new orders)
End Session
Remotely end a student session and trigger automatic grading
Grading & Reporting
Grading is fully automated based on the rubric configured in each scenario. After a session ends:
Results appear in the Grade Book within 60 seconds.
Each rubric item shows a Pass / Partial / Fail status with an evidence citation (timestamped action that triggered the score).
Click any student’s name to view their full AI-generated Debrief Report.
Export individual or cohort results as CSV or PDF from Reports > Export.
NOTE AACN Competency Reporting All rubric items are pre-mapped to the eight AACN Essentials domains. Navigate to Reports > Accreditation to generate CCNE-ready competency reports across any date range or cohort. Longitudinal reports spanning multiple academic years are available for senior students approaching graduation.
7
IT Administration
SSO & LMS Integration
Identity Provider
SAML 2.0 and OAuth 2.0 — compatible with Microsoft Azure AD, Shibboleth, Okta
QoS: Tag SOLOXR traffic with DSCP EF (46) for voice/video prioritization.
Data Security & Compliance
Encryption in Transit
TLS 1.3 — all API calls, asset delivery, and LMS sync
Encryption at Rest
AES-256 — all student records in Microsoft Azure (US data centers)
Authentication
MFA + RBAC — role-based access control enforced at platform level
FERPA Compliance
Student data treated as protected education records; SOLOXR operates as school official
HIPAA
BAA available upon request; HIPAA-aligned administrative and technical safeguards in place
Data Retention
Student simulation records retained for minimum 7 years
SOC 2 Type II
Annual audit report available to institutions under NDA
Breach Notification
24-hour SLA for notification following confirmed breach event
MDM Headset Fleet Management
For institutions deploying 10 or more Quest headsets, Meta for Work MDM is strongly recommended:
Enroll devices at manage.oculus.com/v2/work using your organization credentials.
Push the SOLOXR app silently to all enrolled headsets from the App Management panel.
Configure Wi-Fi profiles, kiosk mode, and auto-update policies to eliminate per-device setup.
Set up device naming conventions (e.g., KSU-SON-001) for easy identification in the SOLOXR admin panel.
8
Troubleshooting
Common Issues & Resolutions
Issue
Likely Cause
Resolution
Cannot log in / SSO redirect fails
Institution SSO misconfiguration or account not provisioned
Contact your IT help desk to verify your account is active in the identity provider.
Simulation loads to black screen
Insufficient GPU / VRAM or corrupted install
Restart the application. If persists, uninstall and reinstall. Verify GPU meets minimum specs.
AI patient not responding to voice
Microphone not activated or background noise
Hold X (Quest) or press F (desktop). Check microphone permissions in system settings.
Choppy movement / low frame rate
Insufficient bandwidth or device overheating
Move closer to the Wi-Fi access point. Remove headset for 5 minutes to allow cooling.
Grades not appearing in LMS
LTI passback delay or misconfiguration
Wait 5 minutes and refresh your LMS course. If missing, contact your instructor or IT admin.
Headset boundary / Guardian lost
Room lighting too low or guardian reset needed
In headset: Meta button > Guardian > Redraw boundary in a well-lit area.
SSO session expired mid-simulation
Session token timeout (default 8 hours)
Press B (Quest) or Escape (desktop) to open the menu. Re-authenticate; session data is preserved.
Application not updating
MDM policy blocking auto-update or storage full
Confirm device has >2 GB free storage. Contact IT admin to push update via MDM.
Contacting Support
Priority 1 — Critical (Platform down / active session blocked)
Phone: Dedicated 24/7 priority line Response SLA: 15 minutes
Priority 2 — High (Feature impaired, no workaround)
Email / Live Chat Response SLA: 2 hours
Priority 3 — Normal (Non-critical issue or question)
Email / Help Center Response SLA: 8 business hours
Self-Service Resources
Help Center: help.soloxr.com Video Tutorials: Available in the Faculty & Student portals
Account Manager (Faculty / Admin)
Named account manager assigned from contract execution Available Mon–Fri, 8:00 AM–6:00 PM Eastern
i
Priority 1 (Critical) incidents are defined as platform outages affecting active student simulations or a faculty-scheduled academic session. SOLOXR commits to restoring service or providing a documented workaround within four (4) hours.
9
Glossary
Term
Definition
AI Standardized Patient
An AI-driven virtual patient avatar that responds to natural language input and adapts its dialogue and physiology based on student decisions.
AACN Essentials
The American Association of Colleges of Nursing core competency framework used for nursing education accreditation.
Branching Scenario
A simulation structure where student decisions dynamically alter the course of the scenario (patient condition, available options).
CCNE
Commission on Collegiate Nursing Education — the nursing program accreditation body.
Debrief Report
An AI-generated post-simulation report containing timestamped action logs, rubric scores, and individualized learning recommendations.
FERPA
Family Educational Rights and Privacy Act — U.S. federal law protecting student education records.
LMS
Learning Management System — the cloud platform managing course delivery, roster sync, grading, and reporting.
LTI 1.3
Learning Tools Interoperability 1.3 — the standard protocol for integrating SOLOXR with institutional LMS platforms.
MDM
Mobile Device Management — enterprise software used to enroll, configure, and manage Meta Quest headsets at scale.
NCLEX NGN
NCLEX Next Generation — updated nursing licensure exam format emphasizing clinical judgment, reflected in SOLOXR simulation-based prep content.
SAML 2.0
Security Assertion Markup Language 2.0 — the SSO protocol used to authenticate users via their institutional identity provider.
SSO
Single Sign-On — authentication method allowing users to log in with their institution credentials without a separate platform password.
Unreal Engine 5
Epic Games’ real-time 3D rendering engine powering the SOLOXR simulation graphics, physics, and environment fidelity.
WebXR
A browser-based API allowing VR/AR experiences to run natively in a web browser without additional plugins.
xAPI (Tin Can API)
A learning data specification used to record granular learner activity and export simulation data to external LRS systems.